![[InlineGrafix-1.gif]](../../grafix/head.gif)
Tools-Palette
HexWeb XT provides a very powerful set of tools to make file links, scale images, see previews, etc. All these features are controlled from one palette called HexWeb Tools.
![[InlineGrafix-2.gif]](InlineGrafix-2.gif)
1. Hyperlinks
There are 3 different hyperlink types available:
Hyperlinks to other Web servers
![[InlineGrafix-3.gif]](InlineGrafix-3.gif)
To create a simple link to another Web server, select a word in a QuarkXPress textbox that will be exported to HTML and click the far left button in the Tools palette:
![[InlineGrafix-4.gif]](InlineGrafix-4.gif) In the resulting dialog, type in the URL for the desired destination and select OK.
In the resulting dialog, type in the URL for the desired destination and select OK.
![[InlineGrafix-5.gif]](InlineGrafix-5.gif)
Hyperlinks to other files in your Web server
![[InlineGrafix-6.gif]](InlineGrafix-6.gif)
To create a link to another HTML file on your webserver, just select a word in a QuarkXPress textbox that will be exported to HTML and click the file button (second from the left) in the Tools palette. Note that all linked words are shown in the Tools dialog. If you have selected the checkbox on the left side of the palette, all links from the page are listed, if not, then only the links in the selected textbox are shown.
![[InlineGrafix-7.gif]](InlineGrafix-7.gif) When the following Open dialog is displayed, select the appropriate destination file.
When the following Open dialog is displayed, select the appropriate destination file.
![[InlineGrafix-8.gif]](InlineGrafix-8.gif)
Anchor links between two words in the same HTML document
![[InlineGrafix-9.gif]](InlineGrafix-9.gif)
Select the first anchor word in a QuarkXPress textbox and click the blue anchor button in the Tools palette. ![[InlineGrafix-10.gif]](InlineGrafix-10.gif)
Type a definitive name for this anchor...
![[InlineGrafix-11.gif]](InlineGrafix-11.gif) ...then select ANOTHER word in a QuarkXPress textbox that will be exported in the same HTML file as the first anchor word, and click the red destination button.
...then select ANOTHER word in a QuarkXPress textbox that will be exported in the same HTML file as the first anchor word, and click the red destination button.
![[InlineGrafix-12.gif]](InlineGrafix-12.gif) Type in exactly the same name as the definitive name you gave to the first anchor. The two words will now be linked in the HTML document you will export.
Type in exactly the same name as the definitive name you gave to the first anchor. The two words will now be linked in the HTML document you will export.
![[InlineGrafix-13.gif]](InlineGrafix-13.gif)
2. Preview in Browser from selected objects
![[InlineGrafix-14.gif]](InlineGrafix-14.gif) Using the Preview button, you can select any number of objects (text and picture boxes) on an XPress page and see a preview in the Web browser of your choice. When you click the Preview button, HexWeb XT creates a temporary export of the chosen elements and sends a command to the browser to show it. All defined header-and footer elements are also exported to the preview.
Using the Preview button, you can select any number of objects (text and picture boxes) on an XPress page and see a preview in the Web browser of your choice. When you click the Preview button, HexWeb XT creates a temporary export of the chosen elements and sends a command to the browser to show it. All defined header-and footer elements are also exported to the preview.
![[InlineGrafix-15.jpeg]](InlineGrafix-15.gif) The "preview" button changes to the "last export" button, when nothing is selected, and you have already exported at least once. This way you have access to the page you exported last, should you need to add elements to it.
The "preview" button changes to the "last export" button, when nothing is selected, and you have already exported at least once. This way you have access to the page you exported last, should you need to add elements to it.

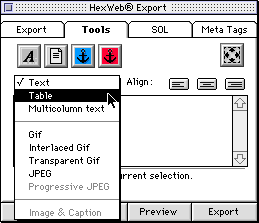
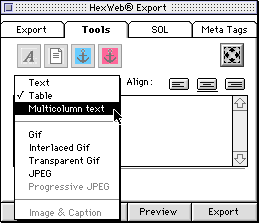
3. Using the "QuickSelect" PopUp to change object types.
In HexWeb XT 2.5 you can change objects to different types, when exporting them. If you select a text box, you can choose any of the given alternatives to convert the text box to an HTML table, GIF, Interlaced GIF, Transparent GIF or a JPEG.
3a. Converting a text box into a table
To convert a text box to a HTML table, just select the object in XPress and then select "table" in the QuickSelect PopUp.
 When you want to define parameters to your table, click the scaling button. The following dialog appears.
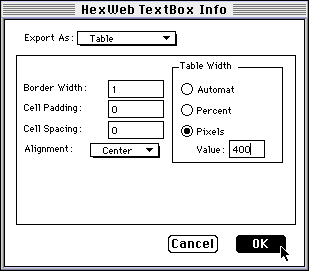 All necessary preferences for your table can be set here. When you are finished, close the dialog, and click the Netscape button for a preview.
Here you see an example of a tabular table
converted with HexWeb XT 2.5
Original tabular table in QuarkXPress:

The same table exported with HexWeb XT 2.5 as an HTML table:
| Year |
1991 |
1992 |
1993 |
1994 |
1995 |
| Revenue |
7 700 |
7 620 |
7 642 |
9 051 |
10 617 |
| Overhead |
3,70 |
-7,10 |
0,80 |
8,00 |
-0,30 |
| Shares |
3,30 |
1,10 |
1,50 |
2,50 |
3,30 |
| P/E |
7-3 |
neg. |
31-10 |
20-12 |
neg. |
| Taxes |
3,1-6,2 |
1,1-2,4 |
1,1-3,3 |
1,6-2,5 |
neg |
JEK |
10,3 |
-5,8 |
5,5 |
12,4 |
-0,3 |
| EK/Shareholders |
74,1 |
63,8 |
62,0 |
66,2 |
91,2 |
3b. Converting text boxes to images
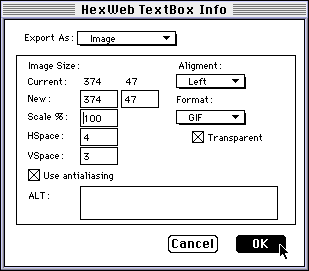
To convert a text object to an image, seelect the object, select the image type in the QuickSelect PopUp, e.g. GIF Interlaced. To make adjustments, click the scaling button.
The following dialog is opened. Here you have a change to adust the size, type and alignment of the image you are going to export. When you are finished, close the dialog and take a preview by clicking the Netscape button.
3c. Exporting image & Caption together in a table
Example of the
Image & Caption feature:
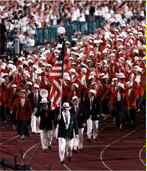 Photo: Associated Press
American wrestler Bruce Baumgartner carries the U.S. flag as he leads the United States delegation.
|
This is one the most powerful new feature of HexWeb XT 2.5
Since many HexWeb XT users are newspaper and magazine publishers, the possibility to keep images together with their caption texts is very important.
To be able to export image & Caption together, select the image & the caption, which belong together, with the object tool. Then go to the QuickSelect PopUp in the HexWeb Tools palette, and select the item type "Image & Caption. You can align the table by clicking the alignment buttons.

Please note that when you want to discard the Image & Caption for the selected objects, you have to select the items and go to the QuickSelect PopUp and select the Image & Caption again. After that, the items are free to be handled individually.
If you have the items selected, and click the scaling button, the preference dialog of Image & Caption is opened.
4. Exporting text as Multicolumn Text.
 To export a text box as multicolumn text do as following:
1. Select a text box, go to HexWeb Tools palette and select "Multicolumn text" as object type.
To define the number of columns you wish to get, column width and the Gutter width, select the text object and click the scaling button. The following dialog, where you can do the adjustments, will appear:

4. Scaling and aligning of images.
![[InlineGrafix-16.gif]](InlineGrafix-16.gif) With this button you can increase or decrease the scale of images, align the images right or left, and type in the ALT-command for users whose Web browsers do not support graphics. It is also possible to set a border, either a black border or a table border surrounding the image.
With this button you can increase or decrease the scale of images, align the images right or left, and type in the ALT-command for users whose Web browsers do not support graphics. It is also possible to set a border, either a black border or a table border surrounding the image.
![[InlineGrafix-17.gif]](InlineGrafix-17.gif)
Select an image and click the scale button. The following dialog appears in which you can define the desired image attributes. When the image is exported, these settings are used.
![[InlineGrafix-18.gif]](InlineGrafix-18.gif)
5. Add to last exported page
![[InlineGrafix-19.gif]](InlineGrafix-19.gif) With this button you can easily add additional QuarkXPress elements to the last exported HTML page. If you are working on a multiple page document, just export the elements from the first page, go to the second page and add the elements from the second page to the exported file.
With this button you can easily add additional QuarkXPress elements to the last exported HTML page. If you are working on a multiple page document, just export the elements from the first page, go to the second page and add the elements from the second page to the exported file.
To view the result, deselect everything on the page and click the "Last Export" button.
The preview button changes to the last export button, when nothing is selected, and you have already exported at least once.
 This is a WWW Service from HexMac International